DIY Proposal Decorations Are Easier Than You Think
Have you ever scrolled through social media late at night, staring at someone’s beautifully decorated proposal scene and wondering, “How much did that even cost?”
Here’s the truth: a truly moving proposal setup has never been about how much money you spend. It’s about how much thought and effort you’re willing to put in, crafting this surprise with your own two hands.
The good news? With just three core elements — balloons, candles, and flower petals — even a complete beginner can create a scene that’ll have your partner tearing up the moment they walk in.
This article walks you through the entire process step by step, from choosing materials and colour schemes to arrangement techniques and common mistakes to avoid, so your proposal setup looks stunning without breaking the bank.
Before You Start: Get These 3 Things Sorted
Before you dive into decorating, there are a few things you absolutely need to nail down first.
First, confirm your proposal venue. Indoor and outdoor setups require completely different approaches. A home or hotel room works perfectly for delicate elements like flower petals and candles. Outdoor venues call for balloons paired with string lights, since petals blow away easily in the wind.
Second, pick a colour palette. Classic red and gold creates a bold, celebratory feel. Pink and white gives off a soft, tender vibe. White and champagne gold looks elegant and refined. Choose one colour scheme and make sure every element revolves around it — that’s the secret to a cohesive look.
Third, set your budget. A DIY proposal setup typically costs between SGD 60 and SGD 350, depending on the size of your venue and how elaborate you want to go. Compared to professional services that can easily run into the thousands, doing it yourself saves a significant amount.
Element One: Balloons — The Visual Star of Your Setup
Balloons are the easiest and most cost-effective element in any proposal decoration. They fill up space quickly and create a festive, joyful atmosphere in an instant.
How to Choose the Right Balloons
There are three common types of proposal balloons, each with a different effect.
Latex balloons are the most basic option. They come in a wide range of colours, cost very little, and work best when used in bulk. Aim for 30 to 50 balloons to create a sense of fullness and abundance.
Metallic balloons have a pearlescent sheen that instantly elevates the overall look when mixed in with latex balloons. Gold and rose gold are the most popular colour choices.
Letter foil balloons are the finishing touch that ties everything together. Spelling out “MARRY ME” or “I LOVE YOU” looks incredible in photos and makes the proposal theme unmistakably clear.
3 Classic Balloon Arrangement Styles
Style One: Balloon Wall. Attach balloons closely together on a wall using tape, stretching from the floor up towards the ceiling. This is the easiest approach to execute, yet the visual impact is stunning. Scatter a few metallic balloons around the edges for added depth and dimension.
Style Two: Balloon Arch. Use a wire frame or balloon columns as support, then tie balloons on one by one to form a semi-circular arch. This shape works beautifully placed directly behind your main proposal spot as a photo backdrop.
Style Three: Floating Balloons. Helium-filled balloons hover in mid-air with ribbons dangling down, transforming any space into something dreamy. Keep in mind that helium balloons only float for about 8 to 12 hours, so inflate them 2 to 3 hours before the proposal.
Balloon Setup Mistakes to Avoid
If you’re decorating outdoors, make sure every balloon is firmly secured. One gust of wind and your entire balloon wall could come apart in seconds. Use fishing line to tie balloons to heavy objects, or use strong double-sided tape on stable surfaces.
Also, don’t inflate every balloon to maximum capacity. Leave a little room for flex — the balloons will be less likely to pop and will actually look rounder and more polished.
Element Two: Candles — Lighting Up the Most Magical Moment
Candles give off a warm, gentle glow that is the single most powerful tool for creating a romantic atmosphere. When the lights dim and flickering candlelight fills the room, your entire space feels like something out of a film.
LED Candles vs. Real Candles?
The answer is straightforward: go with LED candles.
Real candles produce a genuine flame, but the safety risk is simply too high. During the proposal itself, your attention is entirely on your partner — who has time to watch open flames? If a petal or ribbon drifts too close to the fire, you’ll go from romantic to alarming in a heartbeat.
Modern LED candles are remarkably realistic, with flickering flame effects that look almost identical to the real thing. They’re windproof, won’t burn anyone, and can be reused for future occasions. The value is unbeatable.
4 Classic Candle Arrangement Designs
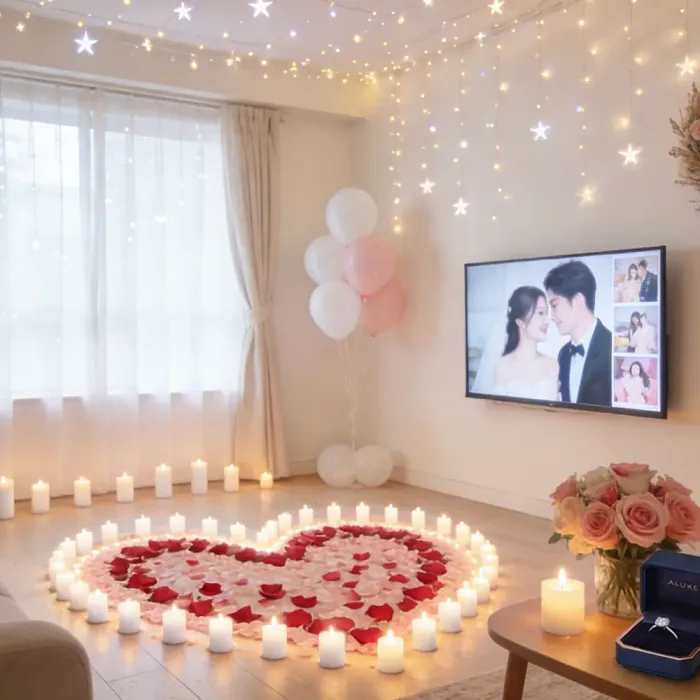
Design One: Heart Shape. The most iconic proposal layout. Arrange 24 to 36 LED candles on the floor in the shape of a heart, with the centre left open for where you’ll kneel. Tip: lightly sketch the shape on the floor with chalk first, then place candles along the line for perfect symmetry.
Design Two: Guided Pathway. Line up candles in two rows from the entrance to the main proposal area, creating a romantic corridor of light. When your partner opens the door and follows the glowing path towards you, that walk itself becomes an unforgettable moment.
Design Three: “MARRY ME” Lettering. Spell out the words on the floor using candles — direct and powerful. This arrangement needs more candles though, at least 50 or more, and requires a larger space to look its best.
Design Four: Scattered Accents. For a dining table or smaller space, place candles across the tabletop, windowsill, and shelves. Pair them with clear glass holders, and the light refracting through the glass creates an especially warm and intimate atmosphere.
Candle Setup Pro Tips
Vary the height of your candles. Placing them all at the same level looks flat and monotonous. Use books, small wooden crates, or overturned cups to elevate some candles, creating visual interest through different heights.
Colour temperature matters too. Warm yellow light suits a proposal scene far better than cool white light. That slightly golden glow makes skin tones look softer and photographs beautifully.
Element Three: Flower Petals — Paving the Path to Happiness
Flower petals are the element that engages the senses most deeply. A floor scattered with rose petals delivers both a visual and an aromatic impact that sends the romance factor through the roof.
Choosing Your Petal Material
Fresh rose petals offer the best texture — soft to the touch with a delicate natural fragrance that enhances the entire atmosphere. Buy them the day before the proposal, store them in the fridge, and take them out about 30 minutes before decorating. You’ll need roughly 10 to 20 packs (about 100 petals each), depending on your venue size.
Artificial petals have the advantage of never wilting, maintaining uniform colour, and costing less. They also come in a wider range of colours, making it easy to match your chosen palette precisely. If you’re unsure about exact timing, artificial petals are the safer bet.
Dried petals sit somewhere in between — they have a natural texture without the risk of wilting quickly, making them a great option if you want beautiful photos.
3 Romantic Ways to Arrange Flower Petals
Method One: Petal Pathway. Scatter petals from the entrance all the way to your main proposal spot, guiding your partner into the surprise you’ve prepared. The petals don’t need to be perfectly aligned — a slightly casual, natural scatter actually looks more charming. Add candles on both sides of the path for double the impact.
Method Two: Heart-Shaped Petal Display. Arrange petals on the floor in a large heart shape, and place candles or your proposal ring inside. Mixing deep red and soft pink petals together adds lovely depth and dimension.
Method Three: Free-Form Scatter. Toss petals casually across the bed, dining table, or sofa, and the entire space transforms into a sea of flowers. This approach takes the least effort yet creates the most powerful sense of being surrounded by love.
Flower Petal Setup Considerations
If you’re proposing at a hotel or serviced apartment, check with the venue beforehand about whether flower petals are allowed. Some places restrict them due to cleaning concerns.
Fresh petals oxidise and discolour over time, particularly white ones. Try to complete your petal decorating within one hour of the proposal to keep everything looking fresh and vibrant.
The Perfect Combination Formula for All Three Elements
Each element looks beautiful on its own, but combining all three is what creates a proposal scene that truly takes your partner’s breath away.
Indoor Classic Setup: Hotel Room or Home
Entrance Area: Place a small cluster of petals just inside the door so the surprise hits the moment it opens. Line both sides with candles to create a welcoming glow.
Walkway Area: A petal pathway flanked by two rows of candles, guiding your partner step by step towards you.
Main Stage: Mount “MARRY ME” letter balloons on the wall. On the floor, use petals and candles to form a heart shape. Stand in the centre, diamond ring in hand, waiting.
Ambient Touches: Place a few floating balloons in the corners, scatter a few candles on side tables, and sprinkle loose petals around the space.
The total budget sits around SGD 120 to SGD 250, but the result far exceeds what the price tag suggests.
Outdoor Romantic Setup: Garden or Rooftop Terrace
For outdoor setups, keep one rule in mind: minimise wind-sensitive elements and secure everything firmly.
Anchor balloons to the ground using balloon columns, arranged in an arch formation. Replace standard candles with glass-enclosed LED versions or string lights. Concentrate flower petals in the main proposal area rather than scattering them across a large space.
If you’re proposing around sunset, the combination of string lights and candles against the fading golden sky creates a scene straight out of a drama.
DIY Proposal Decoration Timeline
Good planning is half the battle. Here’s a recommended preparation schedule:
2 Weeks Before: Confirm your venue, set your colour palette, and create a shopping list. Buy everything at once — balloons, LED candles, petals, letter balloons, tape, ribbons, and other supplies.
3 Days Before: Find a space and do a small-scale rehearsal. Test your balloon inflation, candle spacing, and petal density. Take photos to check whether the overall colour scheme works well together.
1 Day Before: If you’re using fresh petals, visit the flower market today. Double-check that all supplies are accounted for and that your LED candle batteries are charged.
Day Of (2 to 3 Hours Prior): Head to the venue and begin setting up. Start with balloons (they take the longest), then arrange candles, and scatter petals last. Petals go last because they’re the most vulnerable to being stepped on — the later you place them, the more pristine they’ll look.
Budget Breakdown: Big Romance on a Small Budget
Many people assume a proposal setup has to be expensive, but the beauty of DIY is creating maximum impact with minimum spend.
Item
Estimated Cost
Latex Balloons (50 pcs)
SGD 8–15
Metallic Balloons (10 pcs)
SGD 5–10
Letter Foil Balloons
SGD 8–20
LED Candles (24 pcs)
SGD 12–25
Rose Petals (10 packs)
SGD 12–30
Tape, Ribbons & Accessories
SGD 5–10
Total
SGD 50–110
For well under SGD 120, you can create a scene that leaves your partner speechless. Of course, if your budget allows, you can add floating helium balloons, a bouquet, or string lights to take things to the next level.
But always remember — what moves your partner the most is knowing you took the time to set all of this up by hand.
Don’t Forget the Heart of the Proposal: The Ring
No matter how stunning your setup is, a proposal isn’t complete without a ring.
When choosing your proposal ring, diamond quality is key. Understanding the GIA 4C standards — cut, colour, clarity, and carat weight — helps you find the most brilliant diamond within your budget.
The ring style should also reflect your partner’s personal taste. Not sure about their ring size or preference? You can book an in-store consultation and let our professional consultants recommend the perfect match, ensuring every detail is flawless on the big day.
Begin Your Sparkling Journey
Your proposal setup is the romantic overture you dedicate to your partner, and that dazzling diamond ring is the perfect finale to the entire surprise.
Want to learn more about the world of diamonds? Explore our GIA Diamond Knowledge Centre to master everything from the 4C standards to smart buying tips. Or browse our Engagement Ring Collection to find the one that says everything your heart feels.
Ready to take the next step? Book your in-store experience today and let our expert consultants guide you through the most important moment of your life.
References
Editor’s Note
Every time I help someone prepare a proposal, the most common thing I hear afterwards is: “She cried.” And honestly, what makes people cry is never the price tag of the decorations. It’s those balloons taped up by hand, candles placed one by one, and petals scattered across the floor — all of it whispering, “I was willing to spend my time on this, for you.” Wishing every soon-to-be proposer the sweetest “Yes” in return.
FAQ
Make Your Proposal Unforgettable
A beautiful proposal deserves the perfect ring. Let our ALUXE consultants help you find the design, diamond and size that truly match her style, so you can focus on the moment, not the stress.Still unsure about ring style, size or budget? Book a one-on-one proposal consultation and we’ll walk you through every step, from ideas to the final sparkle on her finger.